Installing a Wood Stove into a Shed
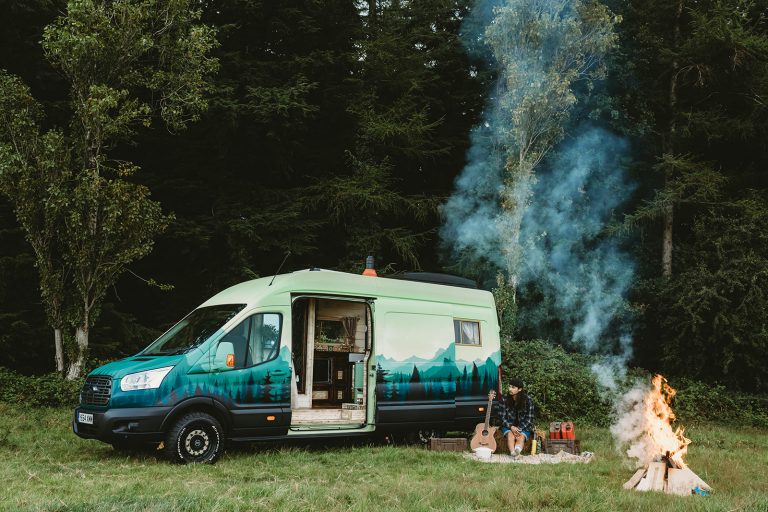
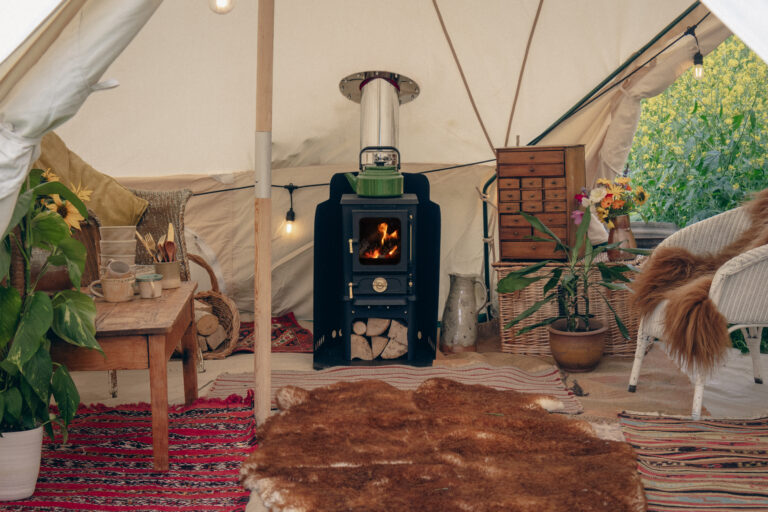
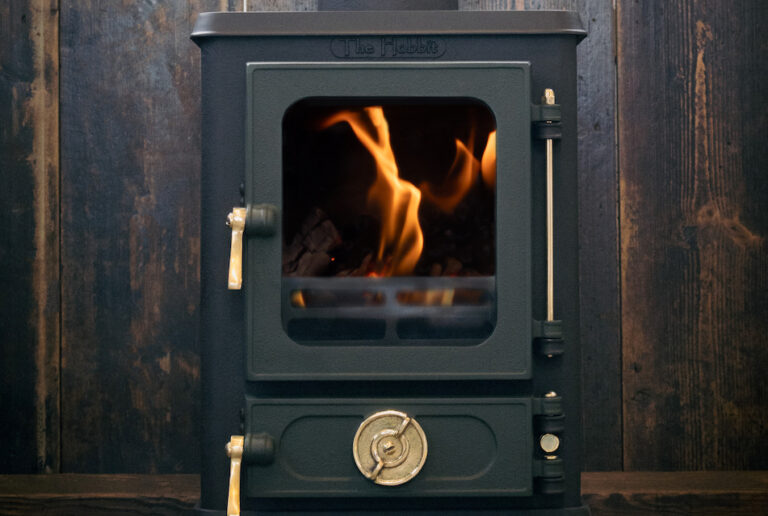
A garden shed can be the ideal retreat from daily life, offering a versatile space for countless activities. Whether you’re working with a garden office, a potting area, a creative workshop, or simply a quiet corner to read, unwind, or cook, adding one of our compact stoves will bring warmth and comfort to your shed sanctuary. Sheds also make a brilliant addition for those in smaller homes, as they can be enjoyed in just about any outdoor space, from larger gardens to modest courtyards. We have designed 3 small stove for sheds, The Hobbit Stove, The Hobbit SE and The Little Range Cookstove.
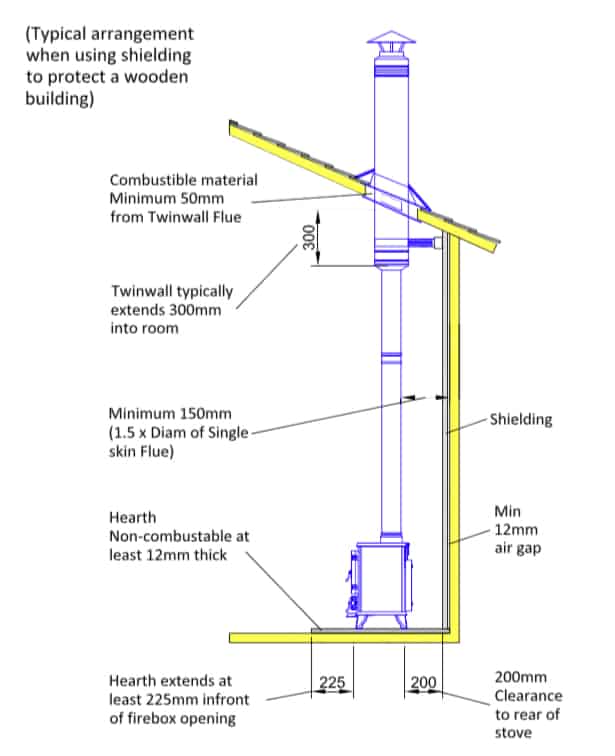
Even when installing a stove in a shed, it’s essential to follow the guidelines set out in Approved Document J. For timber structures, you’ll need to add shielding to the wall or corner where the stove is placed so that it can be safely positioned closer. You can choose from various non-combustible materials for shielding—such as steel sheeting, vermiculite board, or even corrugated tin. Your stove must also be installed on a non-combustible hearth that’s a minimum of 12mm thick, with at least 225mm of space in front of the stove door and 150mm clearance on either side. To see how others have integrated our small multi-fuel stove into their shed setups, take a look at our selection of real-life case studies.
Important installation points to consider
- The tools required for the job
- Your hearth/plinth for the stove to stand on (for our little Hobbit stove, you will need to use a non-combustible material that’s at least 12mm thick)
- Shielding (here, we decided to use some 25mm thick vermiculite boarding)
- Your flue kit
- The stove itself
- Your safety – carbon monoxide alarms and ventilation
Tools Required:
- A drill
- Jigsaw
- Spirit level
- Screw driver
- 10mm drill
- 4mm drill
- Cartridge gun
- Knife
- Marker pen
- Extension lead
- Step ladder
The hearth
If your stove is independently certified to heat the hearth beneath it to no more than 100 degrees celsius (check your manufacturer’s stove details), then the hearth regulations are very simple, as a constructional hearth is not required.
When it comes to installing your small wood stove into a shed, then the hearth needs to be at least 12mm thick, and it will need to be made out of a non-combustible material. For example, you could use a piece of glass, some slate, concrete, or patio tiles. Providing your hearth is at least 12mm thick, you can lay it onto a carpet or a wooden floor, for example, and your stove will sit nicely on top.
There must also be at least 150mm of hearth space at either side and towards the rear of the stove. You will also need to have 225mm of space in front of the stove door as a minimum. This is a safety measure in case a log or some embers roll out of the fire when you open the door to refuel your stove.
The hearth must provide a “visually apparent warning” (see Approved Document J 2.26). This prevents you just simply placing your stove onto a solid floor such as a tiled kitchen floor for example without any discernable visible edge.
The most important reason for the provision of a hearth is to guard against the potential resulting problems in the event of a hot ember falling out of the stove when the door is opened so the frontal hearth requirement is the most important one to adhere to.
Shielding combustible surfaces
If you have any combustible surfaces near your stove, then your small log burner will need to be positioned at least 400mm away from this type of material from the side and 450mm from the rear. Because space is at a premium in a van, you’ll want to reduce these distances as much as possible!
Single Wall requires 3x it’s diameter to combustibles and 1.5x it’s diameter to shielded combustibles, whereas twin Wall requires 50mm/2” clearance to combustibles. The hole to cut through any combustible materials should be 100mm/4” larger overall in diameter than the external diameter of the twin wall pipe. Therefore an 11” hole should be cut through combustibles – the trim plate will then cover this excess hole up
If you have a non-combustible material that the flue pipe is to pass through this can be the same diameter as the pipe (7”). But we would recommend making it very slightly larger so you do not scratch the flue pipe when installing it
Wall Shielding can be done in 2 ways: Vermiculite shielding 25mm thick on a 12mm airgap on spacers. Or 1.5mm metal shield on a 25mm airgap on spacers
If you add shielding to the wall we recommend extending this to at least 200mm above the height of the stove. This protects the wall from the heat coming from the top of the stove. You may need to increase further if using single wall – see clearances above
Hardie-Backer board is a great product for using as shielding as is vermiculite board. A good online place to source your shielding is VITCAS.
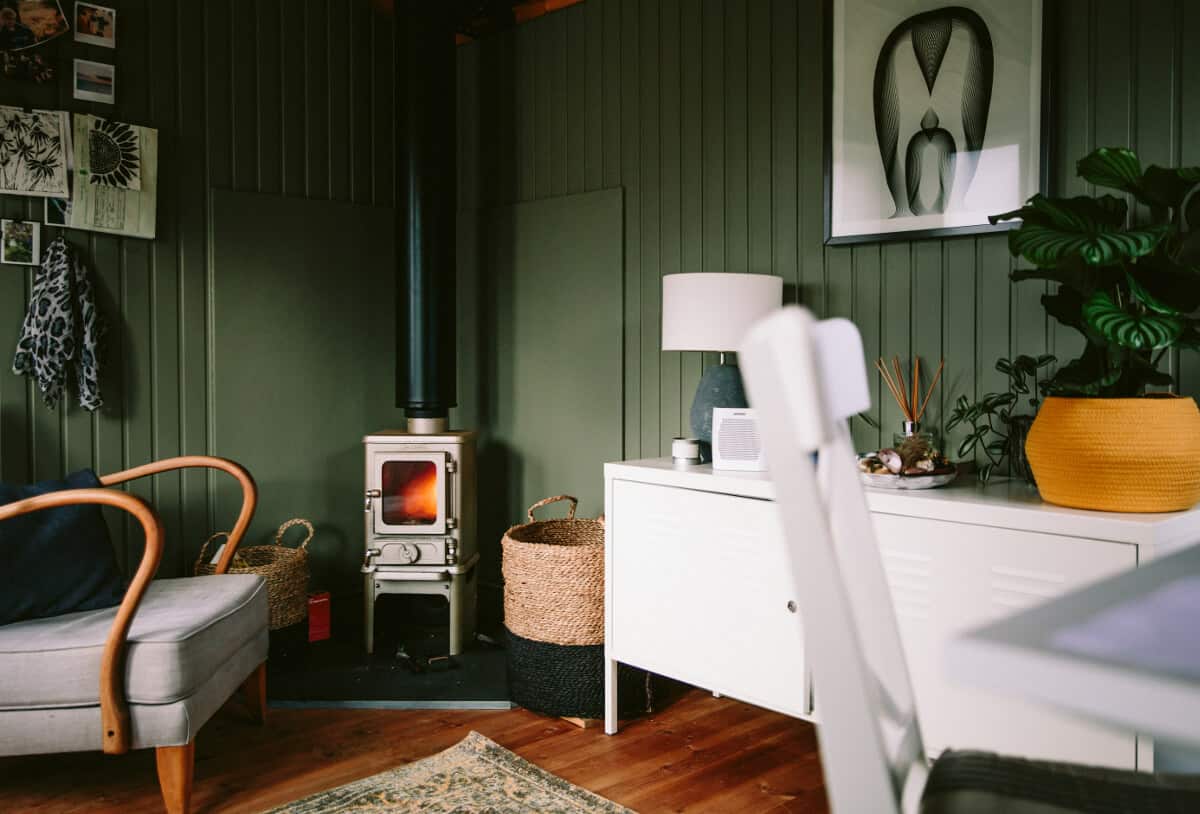
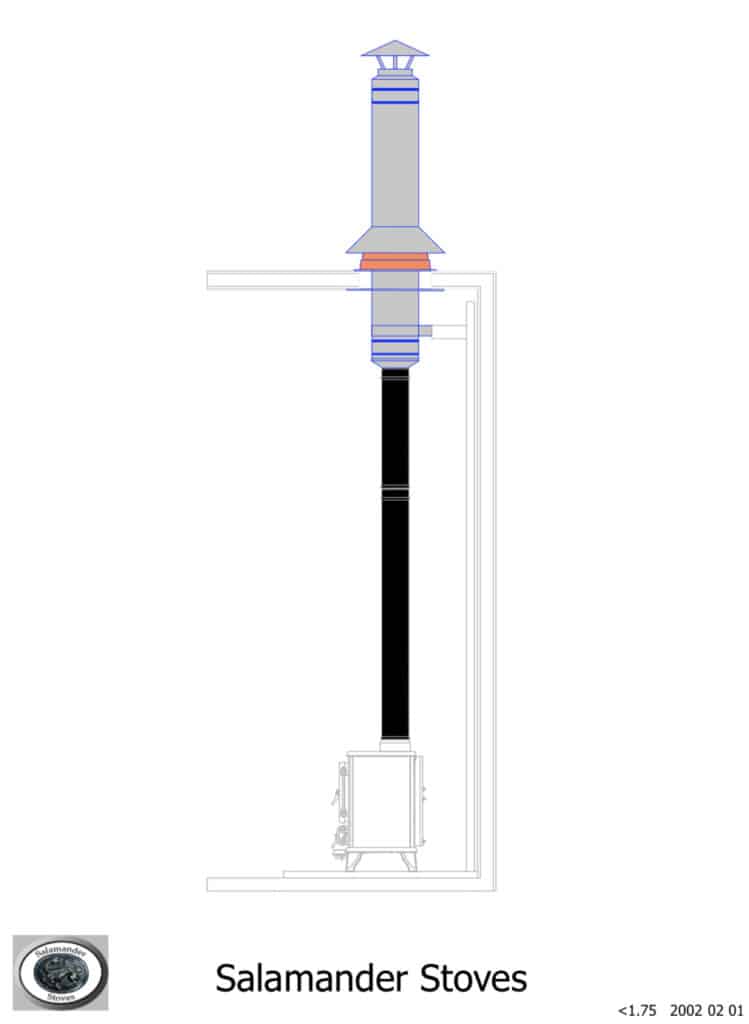
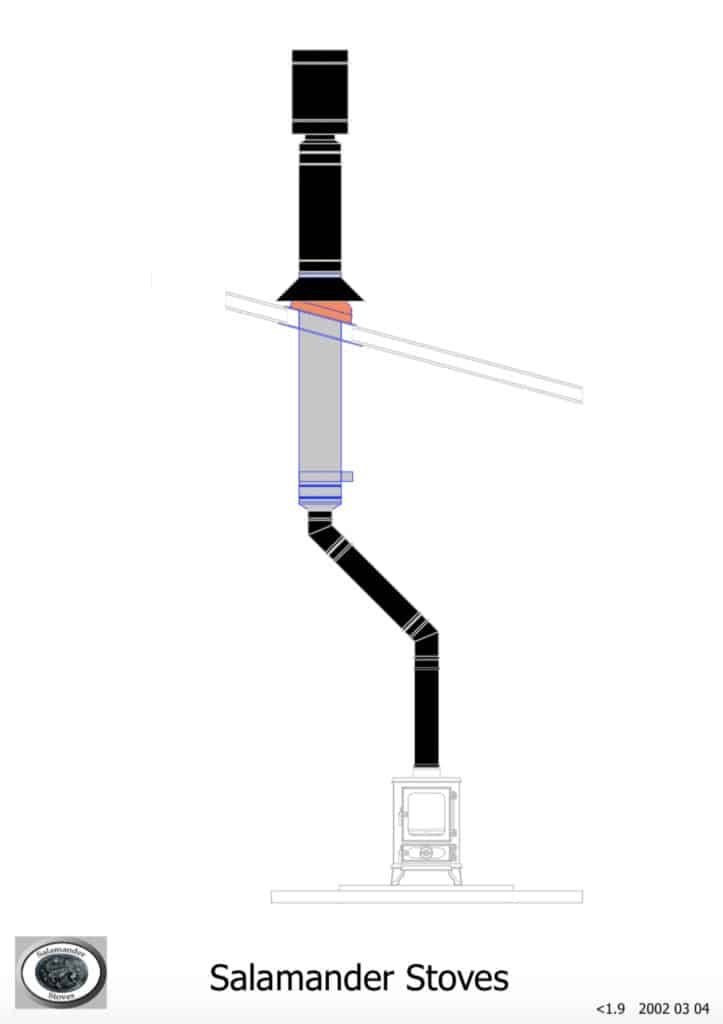
Flue kit
We have designed two different flue kits suitable for a shed. Our Shed Flue Kit 1, and Shed Flue Kit 2.
The small stove
Small stoves are the best choice for small spaces such as sheds, or off-grid living spaces. If you install a stove that is too large then you will never be able to run it properly and you will quickly soot up the flue. Choose a small stove that has a small footprint to maximise the small space you have, like our Hobbit Stove. You may want to consider having an additional back boiler for supplying hot water or to run a small radiator if your shed has been partitioned and has separate internal areas.
The Hobbit Stove with stand is what we suggest is the best ‘shed stove’ to install and will heat a 20′ x 10′ shed no problem.
Safety & ventilation
Installing a CO and smoke alarm in the shed is essential for the safety of everyone inside especially if the shed is very air tight. Good ventilation is also essential and installing an air vent is always a good idea to insure the stove has a good supply of air. Approved Document J.
How to install your small log burner
Step 1:
The hearth needs to be secured on some pads of carpet, adhesive or sand or a stiff mortar. Once the hearth has been positioned the stove can be positioned and the centre point for the flue found by using a plumb line or spirit level.
Step 2:
If you are installing shielding to your walls, attach it using the heat proof adhesive and a couple of screws to hold it in position until the adhesive cures.
Here is a guide to the typical shielding that will be required.
Step 3:
Mark the edge of the hole and drill with a 10mm drill and then cut out the hole using a jigsaw. Attach the wall band support bracket in position ready to accept the 500mm length of twin wall flue pipe. Firstly attach the single to twin adaptor to this length. You can assemble the single wall flue parts and offer everything up to make sure you position the twin wall at the correct height.
Step 5:
Cut the silicone flashing and then attach to the roof. Seal everything using the heatproof silicone. See this post on how to install the silicone boot flashing.
Step 6:
Attach second 500mm length with the AD cowl already attached (flue kit 2) or just attach the standard cowl (kit 1) then attach the storm collar.
Step 7:
Assemble the single wall parts and join each with a seal of fire cement and use a joint clip between each part also. Attach the trim plate or fill the visible void with the length of fire rope.
Step 8:
After you’ve tightened the support bracket bolts, you’re ready for your first fire! This will cure the painted finish on the stove, so it should be done with the van fully ventilated. To prevent the paint from bubbling, it’s best to have a series of small fires to begin with. You can start by burning some firelighters and a few bits of kindling, being sure to let each fire go out and allowing the stove to cool down before you light another, slightly larger fire.