Fitting a Silicone Roof Flashing
In this article and the video below, we’ll guide you through each step to fitting a silicone roof flashing. This guide is part of our series of short videos that will show you how to install a small wood burning stove into a van, a shepherd’s hut, a tiny home or an RV – any vehicle really that has a metal roof!
Fitting a silicone roof flashing is a great way to install your flue system into a shepherd’s hut, a van or a tiny home, as the malleable aluminium edge of the flashing can be formed to fit the contoured metal profile of your roof. Your shepherd’s hut or tiny home might have a roof that’s made of wriggly tin, and our silicone roof flashings are perfect for the job! You can also get them in a round or square shape to suit your preference.
To learn more about fitting a silicone roof flashing, you can watch our instructional video below, or you can follow our step-by-step guide, which is explained in this article.
Step 1 – Mark Out The Hole In Your Roof For Your Silicone Roof Flashing
First, you will need to cut the hole in the metal roof itself. A great way to do this is to use your trim plate as a guide – you can cut a hole which matches the internal hole of the trim plate, as this is just a bit larger than the diameter of the flue pipe.
This method is perfect for working out how big the hole in your roof will need to be, and it ensures a tight fit for your twin wall flue pipes. It’s also worth noting that you will need to maintain at least 50mm of space from your twin wall flue pipes to any combustible materials, such as wood. If your roof has a curve in it, then the hole will be slightly elliptical. An oval/elliptical trim plate can still be used a useful guide for marking out this initial hole!
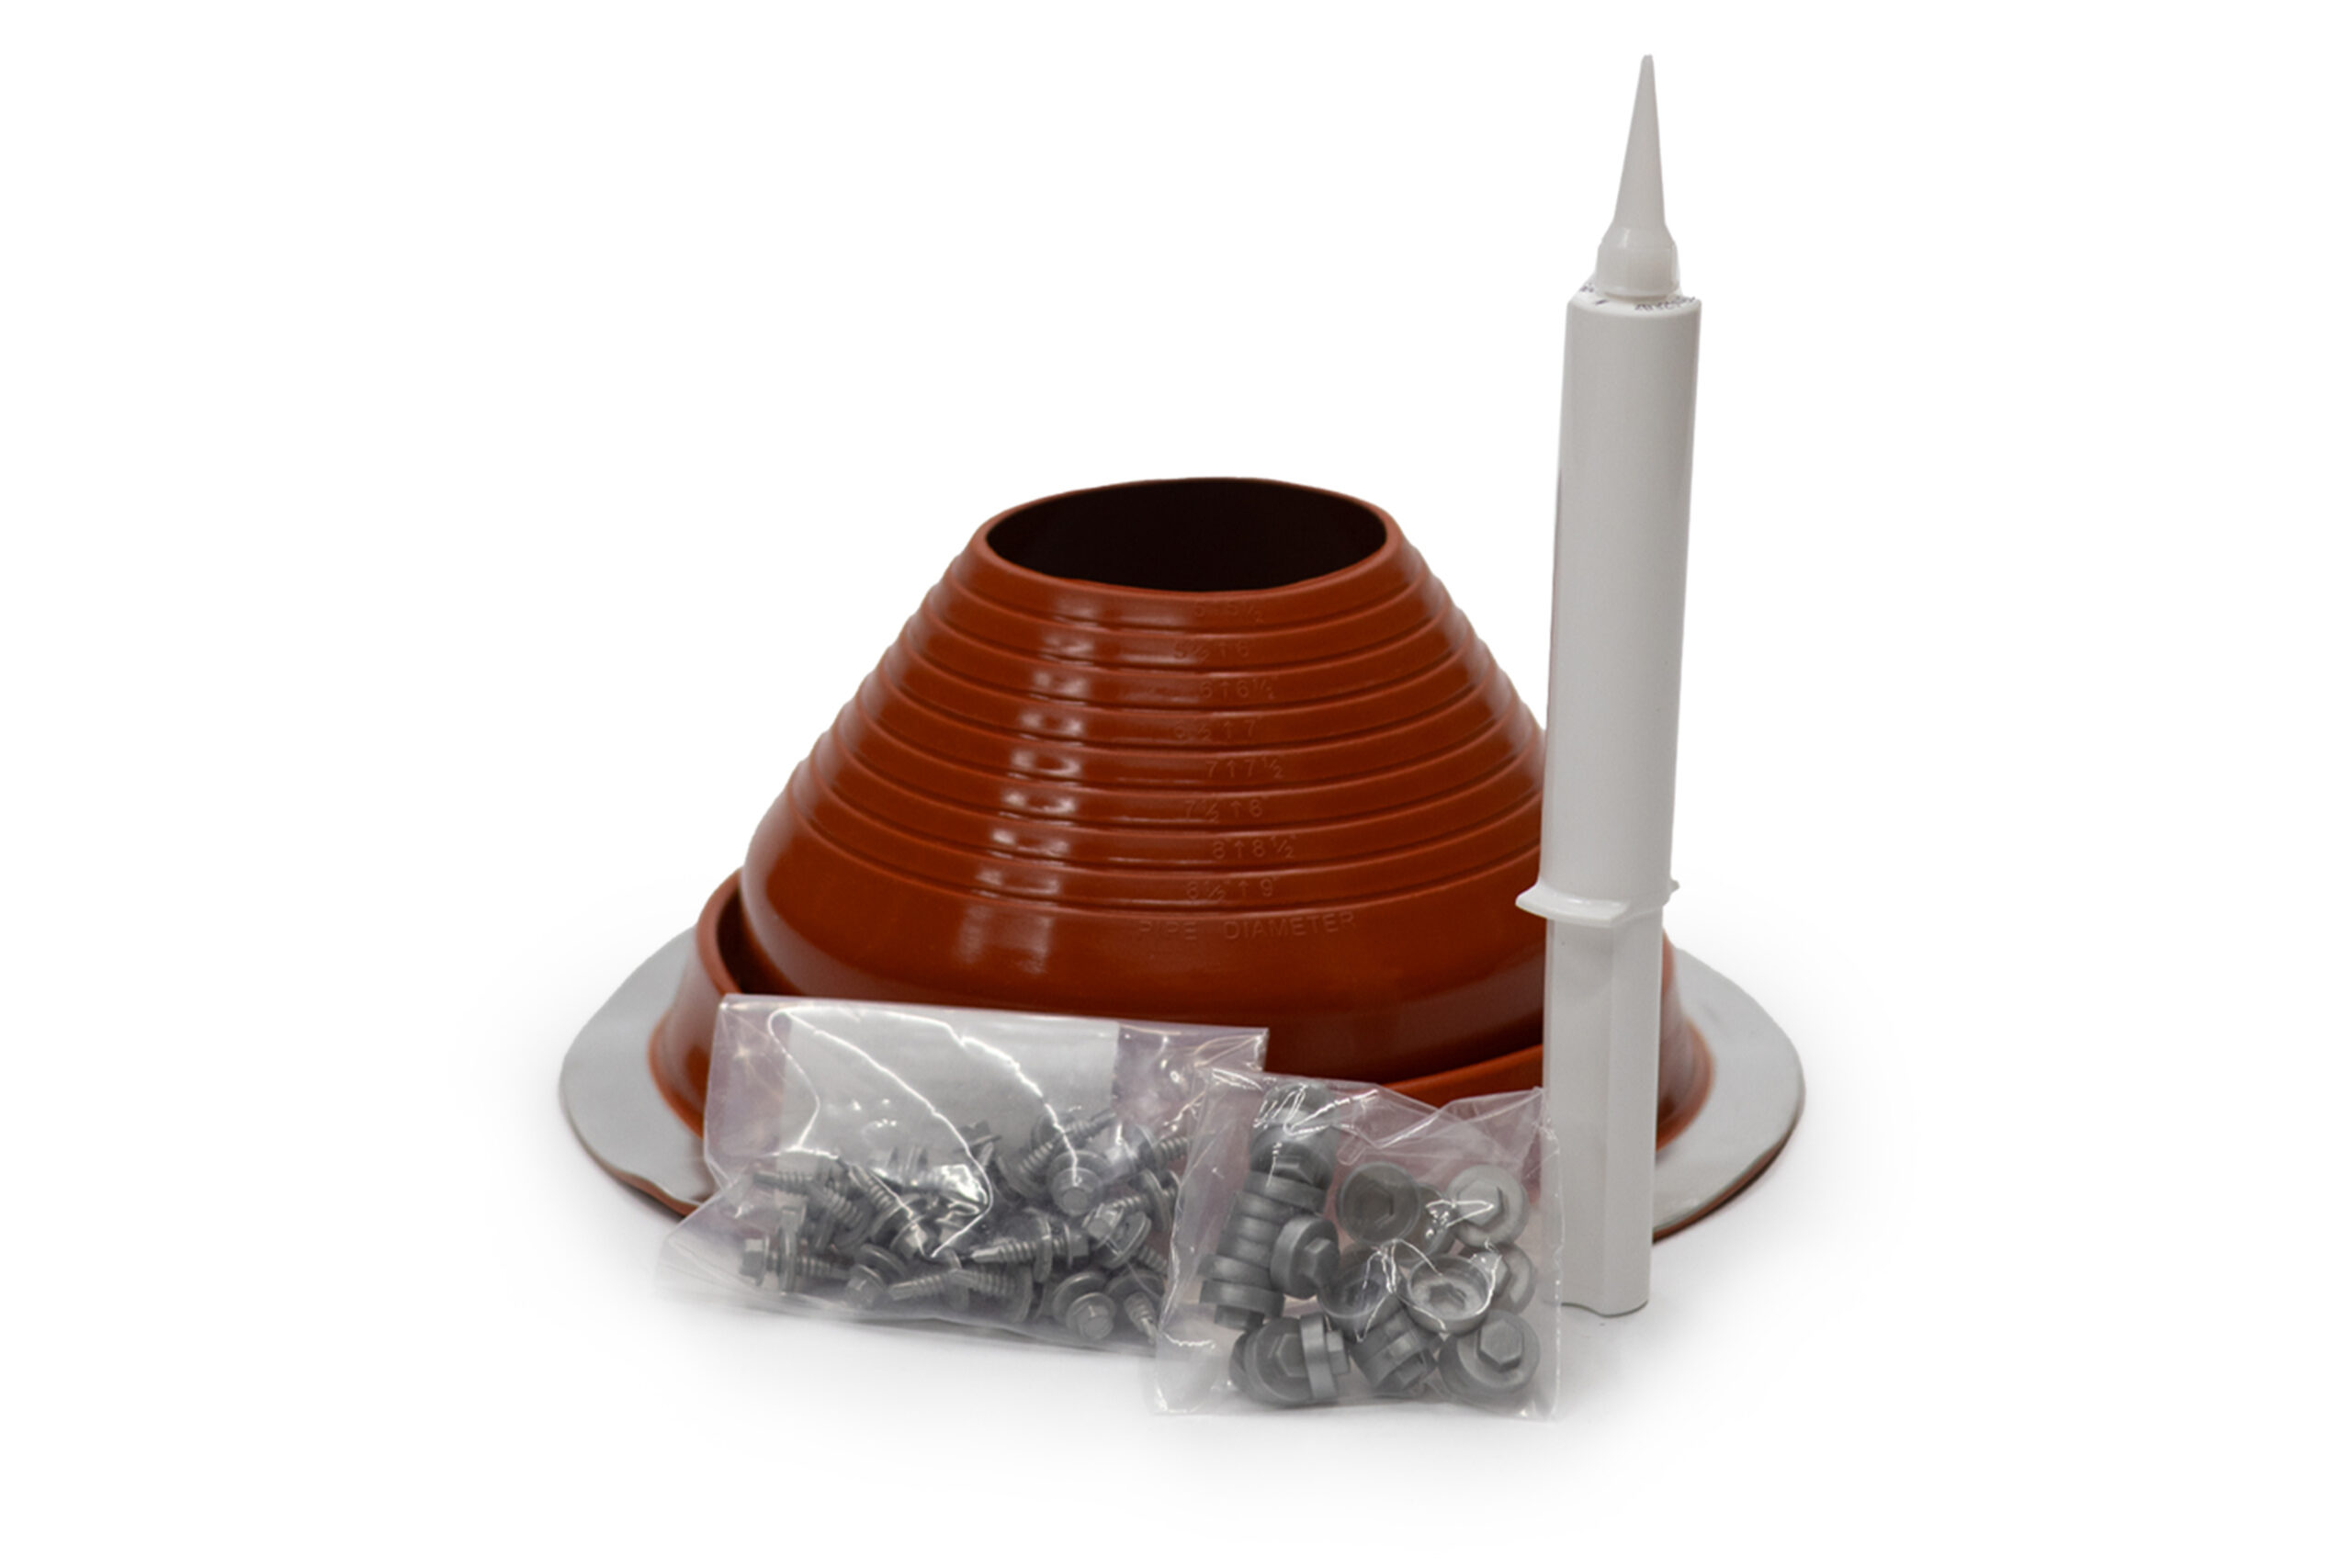
Step 2 – Open The Fixing Kit And Cut The Silicone Roof Flashing To Size
You will also find that our silicone roof flashings come with a fixing kit, which includes:
- A tube of silicone.
- Some self-tapping fixings/tech screws.
- Some plastic caps to go on top of the fixings.

After placing your flashing over the hole, you will need to trim the flashing down to the correct size. We strongly recommend that you do not cut the flashing downwards, as this could potentially make a run. Instead, it’s best if you use a Stanley knife to cut a ring off the top of your flashing to make it the right size.
Step 3 – Mark Out The Positioning Of The Tech Screws. Apply Silicone Underneath The Roof Flashing And Fix It Into Place.
You can then mark the outer edge into sixteenths, which is where you’re going to apply your 16 self-tapping fixings. Next, you can lift up your flashing and apply a zig-zag bead of silicone under the edge of the flashing. You can then carefully push the silicone flashing over your twin wall flue pipe, ensuring that there’s a tight fit. The flashing will stick to your roof, and the malleable edge forms nicely around the contoured profile of your metal roof. Fitting the silicone roof flashing is a fantastic choice if your roof is made out of wriggly tin, for example.
Step 4 – Fix The Self-Tapping Screws And Caps Into Place
You won’t need to drill any holes for the screws, as they will self-tap into the roofing material. To fix them into place, you will just need a good cordless screwdriver with an 8mm bit on the end!
To ensure that the silicone roof flashing is fitted evenly, it’s a good idea to put the tech screws in the order of a 12 o’clock, 6 o’clock, 9 o’clock and then a 3 o’clock positioning. You can then gradually fill in the segments as you go around until all of the screws have been put in, before adding the plastic cover tops.
To fix the caps into place you can add some silicone on top of the heads of the fixings before applying the plastic caps, or alternatively, you can put a spot of silicone inside the cap of the plastic covers and then push them onto the self-tapping screws. If you have any silicone left over after fitting your silicone roof flashing, then you could apply an extra bead of silicone around the top of the flashing for some added weather protection.
Step 5 – Fit Your Remaining Flue Parts
You can also add a storm collar to your flue system, as this will prevent the silicone roof flashing from UV degradation. If you don’t like the orange colour of the flashing, then you can always spray it black. If your roof is at an angle, then you can trim the tangent off of the storm collar itself – again, you could also apply a bead of silicone around the top of the storm collar for some extra weather protection.
Finally, you can attach your rain cap cowl and secure the locking band! A useful addition to your van flue kit is a closure cap, which is included in both of our van flue kits that we’ve designed. If you’re on the motorway or passing under some trees, for example, then you can easily replace your rain cap with a closure cap, to ensure that your flue system remains intact. When you’re parked up, you can easily switch them over again, or you can also add an extra length of flue to improve the draw of your flue system!
If you want to see how other people have installed our small wood burning stoves into their vehicles, make sure you check out our shepherd’s hut case studies, our tiny home case studies, our case studies for vehicles and RV’s or our horse box case studies!
If you’re installing a small wood burner into a van or a canal boat, then you might want to consider adding our gallery rail option to your small wood burning stove! This will enable you to safely retain any pots and pans or a kettle on your stovetop whilst you’re in transit. Your Hobbit stove or Hobbit SE can be fitted with a silver gallery rail or a brass gallery rail, and you can make full use of your stovetop and gallery rail by exiting your flue system from the rear of our small wood stove. We have designed a number of installation kits that exit from the back of our stove, or you can just purchase a rear exit kit if you already have the other flue parts that you need.
It’s also likely that you’ll be pretty tight on space when it comes to installing a small wood stove in a van, and our heat shield option for your stove halves the distances that you will need to maintain when installing your stove! You can read more about this option here.
To check out our range of other exciting stove options make sure you visit our stove extras page! And if you’re at all stuck on deciding what to add to your small wood burning stove, then we’ve also written a guide to customising your small wood burner.